Always test any of the commands with a small amount of ICP first to make sure they really work as intended!
I am not responsible for any financial losses caused by following this guide.
DYOR! I will link all the sources necessary for you to double check everything.
There have been a lot of questions from the community regarding the management of neurons from the command line recently. The documentation provided by the DFINITY Foundation isn’t the best so I decided to make a guide that lists all of the commands needed.
If this guide was helpful, please consider donating to:
3059b7c001b03e9526276fd2520b58590b69e69aa4f0f9a41dce06152cde4876
Prerequisites
This guide assumes that you have followed this guide with the airgap approach. This means that you have the following software installed on your airgapped machine:
keysmithdfx 0.7.1with the.pemfrom your private key importednns-ifacesdownloaded and extracteddidc
All of the commands we are using can be found here.
NOTE: If you haven’t followed the airgap approach, you can still use this guide. Just replace sign with call. Instead of using
dfx canister --network https://ic0.app --no-wallet sign \
ryjl3-tyaaa-aaaaa-aaaba-cai send_dfx \
'(
    record {
        memo = 1 : nat64;
        amount = record {e8s = <AMOUNT_TO_SEND> : nat64};
        fee = record {e8s = 10_000 : nat64};
        to =  "<DESTINATION_ADDRESS>"
    }
)'
you would use
dfx canister --network https://ic0.app --no-wallet call \
ryjl3-tyaaa-aaaaa-aaaba-cai send_dfx \
'(
    record {
        memo = 1 : nat64;
        amount = record {e8s = <AMOUNT_TO_SEND> : nat64};
        fee = record {e8s = 10_000 : nat64};
        to =  "<DESTINATION_ADDRESS>"
    }
)'
Et voilà, you’re done. No need for the send step either.
The commands
In general we do not add the --expire-after flag to our sign commands, this means we have 5 minutes before the signature becomes invalid. In other words, we have 5 minutes to move the message.json to our internet connected machine and send it.
Table of contents
- sending tokens
- create neuron
- add hot key
- get neuron ids
- get neuron info
- follow neuron
- increase dissolve delay
- get full neuron
- spawn neuron
⬆️ Sending tokens
On the airgapped machine do the following, where <AMOUNT_TO_SEND> is in e8s.
dfx canister --network https://ic0.app --no-wallet sign \
ryjl3-tyaaa-aaaaa-aaaba-cai send_dfx \
'(
    record {
        memo = 1 : nat64;
        amount = record {e8s = <AMOUNT_TO_SEND> : nat64};
        fee = record {e8s = 10_000 : nat64};
        to =  "<DESTINATION_ADDRESS>"
    }
)'
There are now two ways to proceed, where I recommend 1) for convienience and because it allows you to directly read the decoded response from your command.
1)
Now run the following command to generate QR code containing the data of the message.json on your airgapped machine
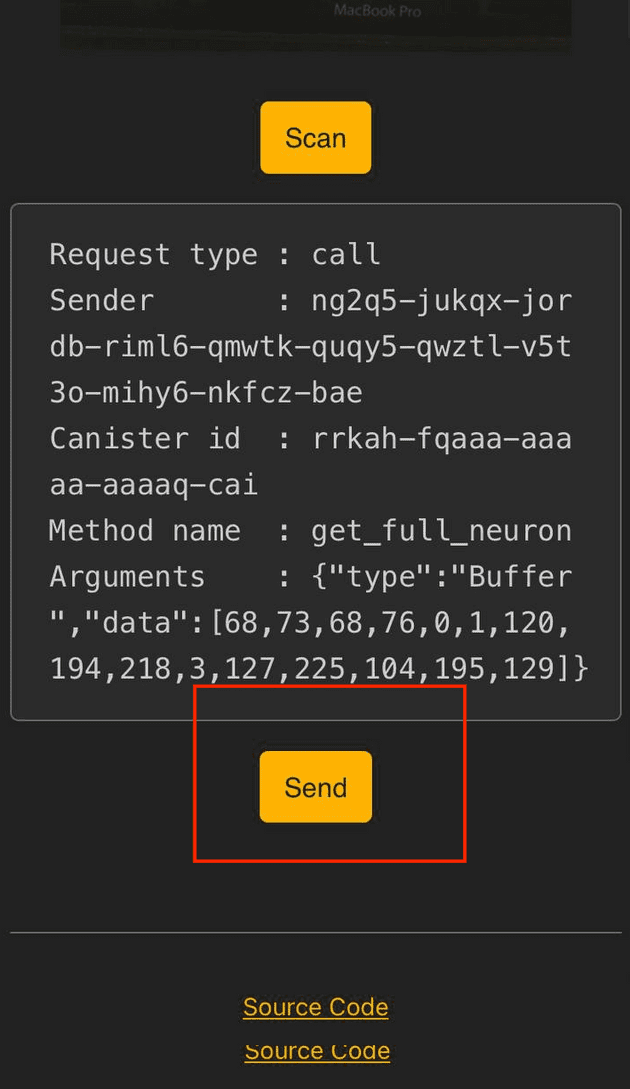
cat message.json|gzip -c|base64|qrencode -o message.pngOpen the message.png and scan the QR Code with the tool provided by Paul Liu (since the transaction is already signed, the app can’t tamper with it). It’s available here and will send the message.json on your behalf and decode the response received.
2)
Move the generated message.json to your internet connected machine and run the following to send the message:
dfx canister --network https://ic0.app --no-wallet send message.jsonNow confirm the message to be sent by entering y and pressing Enter.
A Request ID should be displayed looking something like this:
When using dfx 0.7.1 you can now run
dfx canister --network https://ic0.app --no-wallet send message.json --statusto receive the response of your command. Unfortunately most of the command are in cbor and cumbersome to decode, thus the recommendation of using method 1)
Unfortunately the Request ID can’t be inspected as the Identity on the hot machine is not the one that has signed the corresponding message we just sent.
As the previous step of sending the message is the same for all of the commands, we will ommit it following this section.
⬆️ Create neuron
On your airgapped machine, execute this python script (big thank you to toysrtommy for the initial version I forked) with the principal of your account as an argument. You can access your principal on the airgapped machine using dfx identity get-principal.
python neuron.py <YOUR_PRINCIPAL>Your output should look something like this
address:
2ae0592404f57c1ad09679ca0af77cc21029efcc6648be554c227bb28c7b8a09
memo:
14598549791048202794
Follow the steps in send tokens, but instead of memo = 1 : nat64 use the memo from the previous output to send the <AMOUNT_TO_SEND> of tokens you would like to stake to your neuron. <DESTINATION_ADDRESS> is the address from the output of the previous command. Make sure you send at least 1 ICP, as this is the minimum threshhold for staking.
Before you continue, check that your tokens actually arrived at the address using the internet computer dashboard.
Next run the following command on your airgapped machine and replace
<YOUR_PRINCIPAL> and <YOUR_MEMO> accordingly from the previous paragraph.
dfx canister --network https://ic0.app --no-wallet sign \
rrkah-fqaaa-aaaaa-aaaaq-cai claim_or_refresh_neuron_from_account \
'(record {
    controller=principal "<YOUR_PRINCIPAL>";
    memo= <YOUR_MEMO> : nat64}
)'
In genereal, the memo needs to be taken from the first transaction to the neuron’s address (in case you sent a small amount of ICP first and reached the 1 ICP threshhold for neuron creation with the second transaction).
Send the message.json from your hot machine.
To confirm that the neuron is indeed under your control, run the get_neuron_ids command to retreive your neuron id.
After you got hold of your neuron id, you can run get_neuron_info or get_full_neuron to gather additional information about your neuron.
Neurons created with this method automatically follow the Internet Computer Association on all topics.
⬆️ Add Hot Key
To make your life easier you can add a hot key to control your neuron.
The following actions can be initiated using the principal or a hot key that has been configured:
-Vote-
Have the neuron vote to either adopt or reject a proposal with a specified ID.
-Follow-
Add a rule that enables the neuron to vote automatically on proposals that belong to a specific topic, by specifying a group of followee neurons whose majority vote is followed. The configuration of such follow rules can be used to: a) distribute control over voting power amongst multiple entities, b) have a neuron vote automatically when its owner lacks time to evaluate newly submitted proposals, c) have a neuron vote automatically when its own lacks the expertise to evaluate newly submitted proposals, and d) for other purposes. A follow rule specifies a set of followees. Once a majority of the followees votes to adopt or reject a proposal belonging to the specified topic, the neuron votes the same way. If it becomes impossible for a majority of the followees to adopt (for example, because they are split 50–50 between adopt and reject), then the neuron votes to reject. If a rule is specified where the proposal topic is null, then it becomes a catch-all follow rule, which will be used to vote automatically on proposals belonging to topics for which no specific rule has been specified. If the list of followees is empty, this effectively removes a follow rule.
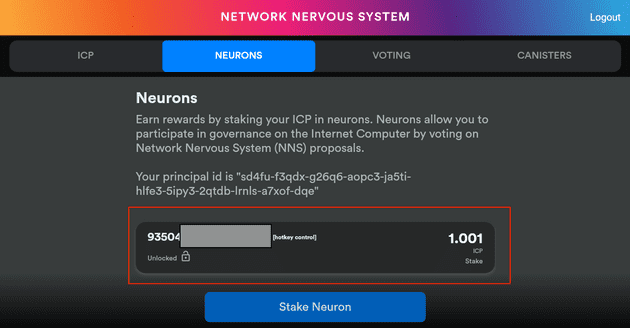
This could be for example the principal of an identity created via nns.ic0.app. You can find the principal id under the neurons tab in the UI.
 With principal of the hot key you want to add at hand and your
 neuron identifier, run the following command from your airgapped machine:
dfx canister --network=https://ic0.app --no-wallet sign \
rrkah-fqaaa-aaaaa-aaaaq-cai manage_neuron \
'(
    record {
        id = record {
            id = <NEURON_IDENTIFIER> : nat64
        };
        command = variant {
            Configure = record {
                operation = variant {
                    AddHotKey = record {
                        new_hot_key = principal "<PRINCIPAL_OF_NEW_HOT_KEY>"
                    }
                }
            }
        }
    }
)'
Send the message.json from your hot machine.
Confirm that every worked as expected in the neurons tab of the NNS UI. You should now see a new neuron.

⬆️ Get neuron ids
Run the following command from your airgapped machine to get the neurons under the control of your principal:
dfx canister --network https://ic0.app --no-wallet sign --query \
rrkah-fqaaa-aaaaa-aaaaq-cai get_neuron_ids
Send the message.json from your hot machine.
The following steps are only necessary if you follow the second approach described (here)[#send-tokens]. If you use the first approach, the message will be decoded directly for you by the app.
This will lead to an output that looks something like this
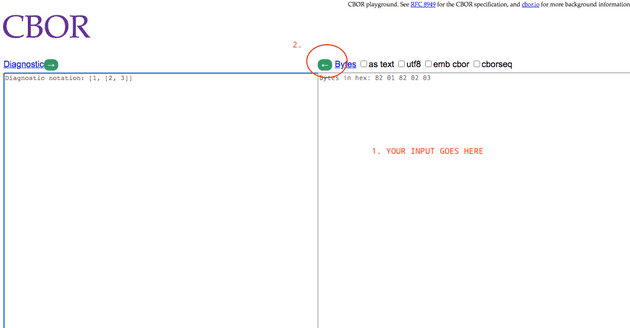
To see the content of the response, copy-paste the encoded string into cbor.me.
Response: d9d9f7a266737461747573677265706c696564657265706c79a163617267524449444c016d78010001c2da037fe168c381
Take the response and and head over to cbor.me where you copy it into the right input field. Press the green left arrow above the input field.
 On the left input field something like this should appear now
55799({"status": "replied", "reply": {"arg": h'4449444C016D78010001C2DA037FE168C381'}})Take the value of arg without the h, now run the following didc command to retreive your actual neuron identifier
didc decode <ARG_VALUE>With the response from above this command would look like this:
didc decode '4449444C016D78010001C2DA037FE168C381'Store your neuron identifier so you don’t have to repeat those commands again.
⬆️ Get neuron info
To get information about a neuron, use it’s neuron identifier with the following command on a hot machine:
RESULT="$(dfx canister --network=https://ic0.app --no-wallet call \
rrkah-fqaaa-aaaaa-aaaaq-cai get_neuron_info \
'(
    <YOUR_NEURON_IDENTIFIER> : nat64
)' \
--output=raw)"
Now run (this assumes that your extracted the nns-ifaces-0.8.1in your Downloads folder, if not change the path accordingly)
didc decode -t "(Result_2)" -d ~/Downloads/nns-ifaces-0.8.1/governance.did $RESULTThis should lead to an output looking something like this:
(
  variant {
    Ok = record {
      dissolve_delay_seconds = 0 : nat64;
      recent_ballots = vec {};
      created_timestamp_seconds = 1_622_647_916 : nat64;
      state = 3 : int32;
      retrieved_at_timestamp_seconds = 1_622_665_306 : nat64;
      voting_power = 100_103_447 : nat64;
      age_seconds = 17_390 : nat64;
    }
  },
)⬆️ Follow neuron
Note that this can also be done from the UI after adding a hot key!
On the airgapped machine do the following, where <MY_NEURON_ID> is the neuron you want to configure.
The mapping from <NEURON_TOPIC> to int32 can be found here.
Possible neuron identifiers to follow are
| Entity | Neuron ID |
|---|---|
| DFINITY Foundation | 27 |
| Internet Computer Association | 28 |
| ic.associates | (soon to be announced) |
dfx canister --network=https://ic0.app --no-wallet sign \
rrkah-fqaaa-aaaaa-aaaaq-cai manage_neuron \
'(
    record {
        id = opt record { id = <NEURON_ID> : nat64};
        command = opt variant {
            Follow = record {
                topic = <NEURON_TOPIC> : int32;
                followees  = vec {
                    record { id = <NEURON_ID_1> : nat64};
                    record { id = <NEURON_ID_2> : nat64}
                }
            }
        }
    }
)'
Send the message.json from your hot machine.
⬆️ Increase dissolve delay
From your airgapped machine run the following command and replace <ADDITIONAL_DISSOLVE_DELAY_IN_SECONDS> with the amount of time you want to increase the dissolve delay by in seconds while using the correct <NEURON_ID>:
dfx canister --network=https://ic0.app --no-wallet sign \
rrkah-fqaaa-aaaaa-aaaaq-cai manage_neuron \
'(
    record {
        id = opt record {id = <NEURON_ID> : nat64};
        command = opt variant {
            Configure = record {
                operation = opt variant {
                    IncreaseDissolveDelay = record {
                        additional_dissolve_delay_seconds = <ADDITIONAL_DISSOLVE_DELAY_IN_SECONDS>: nat32;
                    }
                }
            }
        }
    }
)'
Send the message.json from your hot machine.
⬆️ Get full neuron
NOTE: This command needs dfx
0.7.1To get detailed information about a neuron, use it’sneuron identifierand run the following command.
dfx canister --network=https://ic0.app --no-wallet sign \
rrkah-fqaaa-aaaaa-aaaaq-cai get_full_neuron \
'(
    <YOUR_NEURON_IDENTIFIER> : nat64
)'
Now run the following command to generate QR code containing the data of the message.json on your airgapped machine
cat message.json|gzip -c|base64|qrencode -o message.pngOpen the message.png and scan the QR Code with the tool provided by Paul Liu (since the transaction is already signed, the app can’t tamper with it). It’s available here and will send the message.json on your behalf and decode the response received.
⬆️ Spawn neuron
From your airgapped machine run the following command and replace <NEW_CONTROLLER_PRINCIPAL> with the principal of the owner of the spawned neuron, while using the correct <NEURON_ID>:
dfx canister --network=https://ic0.app --no-wallet sign \
rrkah-fqaaa-aaaaa-aaaaq-cai manage_neuron \
'(
    record {
        id = opt record {id = <NEURON_ID> : nat64};
        command = opt variant {
            Spawn = record {
                new_controller = principal "<NEW_CONTROLLER_PRINCIPAL>"
            }
        }
    }
)'
Send the message.json from your hot machine.
